Templates
The 7.00 uses template files to modify mailbox behavior and call routing in various ways. While global templates may be reviewed while editing a mailbox in the Mailbox Editor, they cannot be modified (with the exception of COS templates).
To create, modify or delete global templates, you must use the Templates menu item and the Template Manager. This restriction is enforced because most global templates are used by multiple mailboxes. If you are allowed to change a global template while editing a mailbox, it may affect other mailboxes without you realizing it. COS editing is allowed as a convenience to the user (as they are the most commonly edited templates), but you should still be careful when making changes to them.
The Templates menu is shown in the figure below:

As shown, there are seven different types of system templates, each serving a different purpose:
| Template Type | Description |
|---|---|
| Call Routing (CRP) | Defines both pre- and post-processing for calls into the given mailbox. |
| Class of Service (COS) | Defines mailbox attributes and subscriber permissions and restrictions. |
| Message Delivery (MDT) | Defines message forwarding options. |
| Notifications (NTF) | Defines notification options triggered by certain events (such as receiving a message). |
| Question and Answer (QAS) | Defines the Q & A script used by a QA mailbox. |
| Scheduled Events (EVT) | Defines changes to mailbox behavior that occur on a scheduled basis, overriding various mailbox settings (including the active COS and SDA templates). |
| Single Digit Action Codes (SDA) | Defines user input options available during playback of the mailbox greeting. |
Template Manager
When you select a template type from the Templates menu, the system will open the Template Manager, a dialog that lists all template files of the selected type that are available for use. This dialog allows you to easily manage these files, providing options for editing, copying and deleting the files as well as for importing or creating new files.

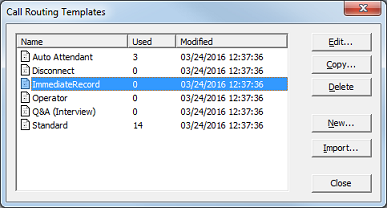
The figure above shows the Template Manager opened for managing call routing templates. The only real difference when managing any other template type is what is displayed in the title bar; it will always display a label that identifies the type of template being managed.
The main part of the dialog is a table listing all loaded files for the given template type. The Name column lists the filename (not including the file extension). The Used column tells you how many mailboxes are currently using that template. Finally, the Modified column tells you the when the file was last modified.
To the right of the table are several buttons: Edit, Copy, Delete, New, Import and Close.
Edit
To edit a template file, select the file in the table and then click Edit (if no file is selected, the button will be disabled). This will open the appropriate edit dialog with the selected template file loaded. You will be able to change settings in the template and then save them in the same file or in a new file.
Copy
Copying is useful if you want to create a new template that is the same as an existing template except for a few changes and you do not want to simply change and overwrite the existing template.
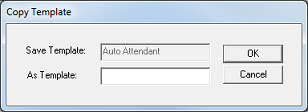
To copy a template file, select the file in the table and then click Copy (if no file is selected, the button will be disabled). This will open a dialog allowing you to enter the filename for the new file, as shown below.

Enter the new filename. Do not enter the file extension as the correct extension will be appended automatically. Click OK to complete the copy.
As soon as you click OK, the system will open the appropriate dialog to edit the template so you can make your changes. When you are finished editing, click OK to save the changes. The new template will now appear in the list.
Delete
The delete option is only available if the selected template is not being used by any mailbox in the system.
To delete a template, select the file in the table and then click Delete. You will be prompted to confirm your intention. Select Yes to delete the file or No to cancel the action.
The system maintains a number of factory default template files in a special directory. Those files cannot be edited or deleted directly; you have to import them first (see below). When you delete one of these files, it is the imported copy that is deleted. The original remains in the special directory so that you can always re-import it at a later time. In the same way, when you edit a template, you are editing the imported copy, not the original. However, any templates you create yourself will be unrecoverable if deleted.
New
To create a new template file from scratch, click New. This will open the appropriate template editor dialog pre-configured with default settings. You can then edit those settings as desired and save the template with a unique filename.
The filename only needs to be unique with respect to templates of the same type. For example, the system provides both a standard COS template and a standard SDA template. But there cannot be two different COS templates named standard.
Import
The 7.00 maintains its own directory of factory-defaulted template files for various common uses. This includes the basic templates used by default for the various mailbox types (e.g., standard.crp, standard.cos, standard.sda, etc.). These factory default files cannot be edited, deleted, or even used directly. To use or edit one of these templates, you must first import it into the list of active templates. Note that many of these templates are already imported for you by default. However, if you edit an imported file (or delete it) and subsequently want to revert to the factory default settings for that template, just re-import it (this will overwrite the existing copy, if one exists).
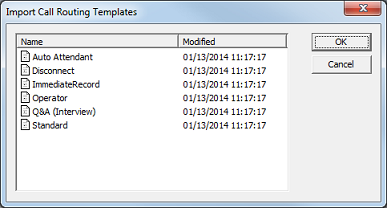
To import a template file, click Import. This will open a dialog that lists all available factory default templates of the given template type. The figure below shows the Import dialog for call routing templates:

Select the template files you want to import from the list (use the Ctrl key or Shift key to select more than one file). Click OK to import them or Cancel to close the dialog without importing anything.
If any of the files you selected to import already exist in the active list, you will be prompted to confirm that you wish to overwrite the existing file for each such file. Click Yes to overwrite that file or No to skip it.