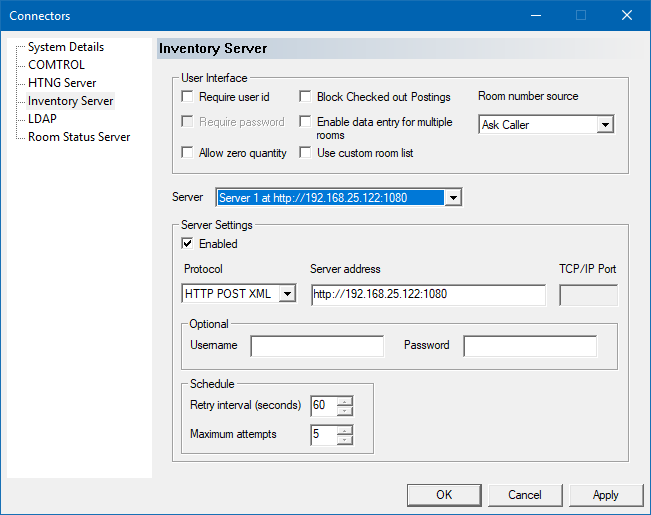
Inventory Status Interface
The Inventory Status Interface (ISI) is a telephony interface designed to allow users to report item and quantity information to one or more remote servers. Although the original conception was to provide a method for a hotel's housekeeping staff to report usage of items from the guest room minibar, the interface has been designed to allow for any type of inventory reporting a user may require.
This dialog is used to configure both the telephony interface and how to communicate with the remote server(s) or PMS.

User Interface Settings
These settings configure how the telephony user interface operates.
| Setting | Description |
|---|---|
| Require user id | Check this box to prompt for a user ID at the start of the call. If this option is disabled, the system will not ask for a password either. |
| Require password | Check this box to require a valid password after prompting for the user ID. If the Require user id setting is disabled, the system will never ask for a password, even if this setting is enabled. |
| Block checked out postings | Check this box if you want the system to block the housekeeping staff from posting minibar charges in checked-out rooms. |
| Allow zero quantity | Defaults to force client to enter a value greater than 0. Checking this field allows them to enter a quantity of 0 or skip entry. |
| Use custom room list. | If checked the Administrator must add individual rooms to the Inventory Web Interface. Default is unchecked which uses the list of guest mailboxes. |
| Enable data entry for multiple rooms | Check this box if you want the telephony interface to allow data entry for more than one room in the same call. Default is disabled. |
| Room number source | Use the selection box to select how the room number is determined.
|
Global Settings
This section lists server-side settings that are global across all servers.
| Setting | Description |
|---|---|
| Post Delay (seconds) | Set the amount time after a change is sent to the ISI before it is posted to all configured servers. Value is in seconds. Range is 10 to 999 seconds. Default is 60 seconds. |
Per-Server Settings
Use the selection box to choose one of five servers to configure, then configure the remaining settings for the selected server.
| Setting | Description |
|---|---|
| Enabled | Check this box to enable the selected server. |
| Protocol | Select the protocol to use for the selected server.
|
| IP address or name | Enter a valid URL address or server name for the remote server. Examples: http://192.168.25.122/ivr/isi or https://192.168.25.122/ivr/isi |
| TCP/IP port | Enter the TCP address to use to connect with the remote server. Only used when connecting to Opera. |
| Username | Optional username in order to support basic security. |
| Password | Optional password in order to support basic security. |
| Retry interval | Enter the number of seconds to wait after failing to connect to the remote server before making another attempt. The default value is 60 seconds. |
| Maximum attempts | Enter the maximum number of times to attempt connecting to the remote server before logging a failure. The default value is 30 attempts. |
If the protocol is set to either Comtrol, Opera Minibar or Opera Direct Charge, all fields in the Server Settings box except Enabled and Protocol will be grayed-out and ignored.
In the case of Comtrol, the data is routed through the Comtrol connector so all further configuration must be done on the Comtrol connector page.
For the two Opera protocols, the data is routed through the hospitality server so that it gets sent to the Opera PMS over the PMS Link.