IP Office 9 using SIP Extensions
For DuVoice 6.0 SIP please follow IP Office 10.x integration notes.
This document does not cover server edition and is intended for standalone IP Office IP500 and IP500v2.
All configuration is performed from the Avaya IP Office Manager application. This application can be installed on the DuVoice system without interfering with the DuVoice operation and is suggested for easy configuration checks by DuVoice technical support.
Features
- Name display change.
- User rights changes (COS).
- MWI set/clear (Shortcodes).
NOTE: Avaya IP Office only supports message waiting lights on SIP phones on versions 9.1 and above. - Emergency Alerts.
- CTI Pro license required on every IP Office system that will be monitored
- TAPI Features requiring CTI Pro.
- DND or Call Forward All.
- Offhook station monitoring.
- MWI set/clear.
- Emergency Alerts. (DEVLINK)
Requirements
- Lan with internet access.
- CTI Pro if using:
- Emergency Alert Notification.
- Performing message waiting using TAPI.
- Station monitor for offhook stations.
- 3rd Party IP Endpoints License. One license for each line on DuVoice.
- Voice Compression Module. Example: VCM64/ATM4.
Recommendations
- IP Office Manager installed on local machine.
- IP Office System Status installed on local machine (part of admin install).
PBX Configuration
Security Configuration
These changes are required for support of Name and User Rights changes.
Services Configuration
From the Avaya IP Office Manager.

- Select File | Advanced | Security Settings…
- Choose your IP office and click Ok.

- Login using the security account.
Default Service User Name: security
Default User Password: securitypwd
- Choose System from the Security Settings.
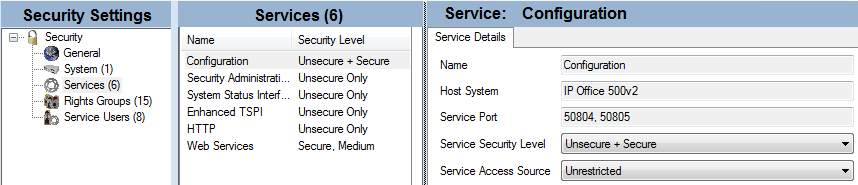
- Service Security Level
Select Unsecure + Secure.
Certificate Update
The IP Office name change interface requires a valid certificate on the IP Office. This certificate expires every three years automatically. If they DuVoice system was changing names and suddenly stops the certificate is most likely the cause.
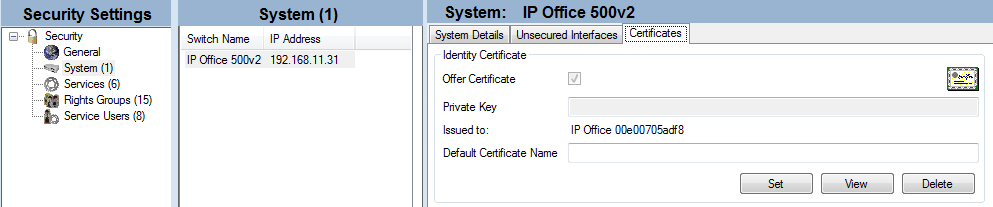
- Choose Certificates Tab on the right.
- Click View.
Check the expiration date. In this example you can see the expiration date of 02/14/2015.
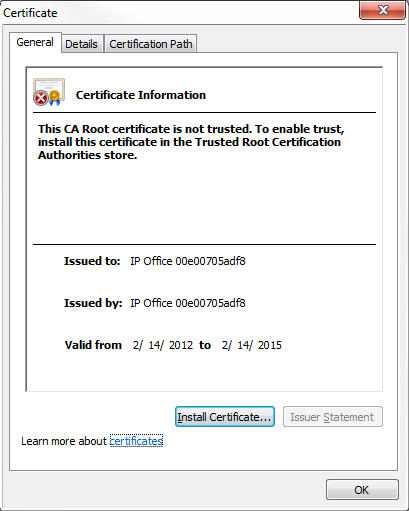
- Click Ok.
- Note: If the certificate has expired click Delete.
- WARNING: If you press Delete the PBX will drop all calls and may be unavailable for up to 5 minutes.
- Save the settings.
Line Configuration
Using SIP
These settings should only be use when interface with the DuVoice via SIP.
System
SIP Registrar settings can be configured for either LAN1 connection, typically only LAN1 is used however. When configuring the DuVoice you will use the IP address of the LAN port you enabled the registrar for.
Enable SIP Registrar
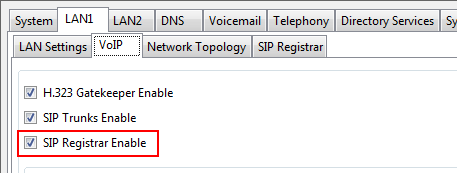
- SIP Registrar Enable
This field should be checked.
SIP Registrar
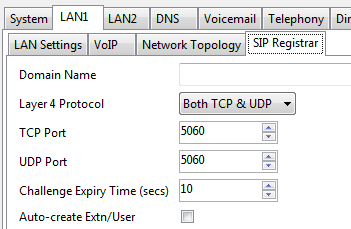
- Auto-create Extn/User
This field should be unchecked for most installations.
SIP Extension
Each line on the DuVoice will require it's own extension each configured using the following steps.
Extension Extn tab
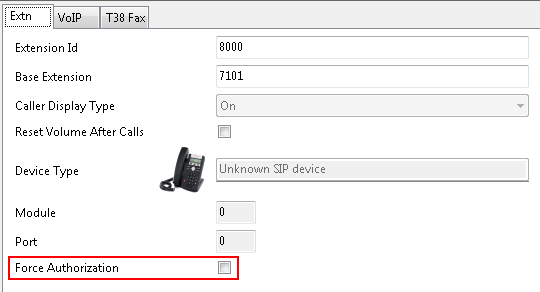
- Force Authorization
DuVoice suggests not to use authentication so this field should be unchecked.
Extension VOIP tab
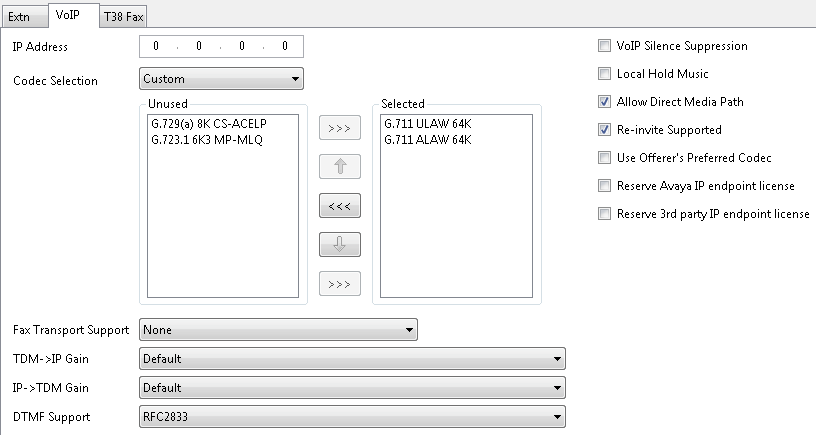
- Codec Selection
Set to Custom and remove all but G.711 ULAW 64K and G.711 ALAW 64K from the Selected column. - Selected
Reorder the codecs so G.711 ULAW 64K is first. - DTMF Support
Set to RFC2833. If during testing you find the system not responsive enough to DTMF you may try Inband.
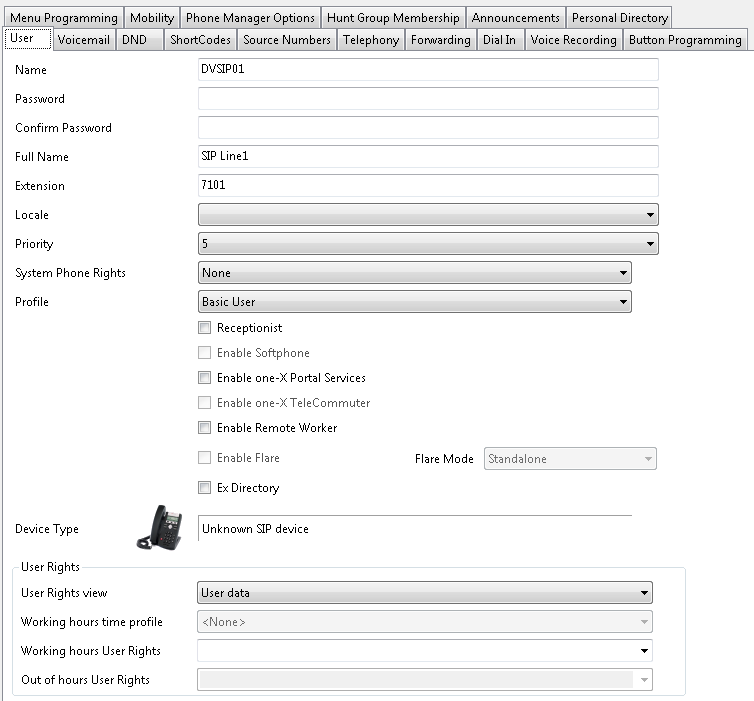
Users
Create a user for each of the DuVoice extension.
Voicemail
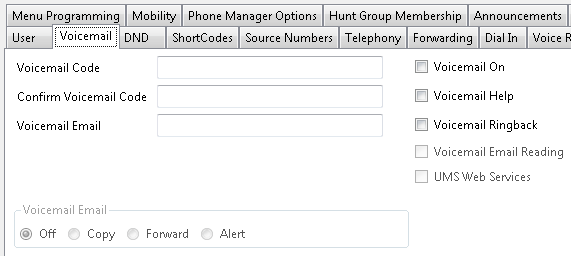
- Voicemail On
uncheck this setting.
Telephony
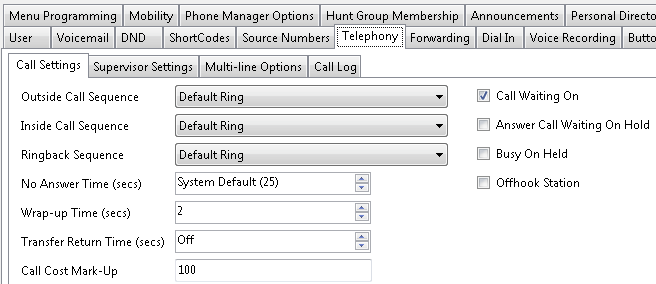
- Call Waiting On
For SIP extensions Call Waiting On must be checked in order to support transfers. If this is analog leave this field unchecked.
Button Programming

- Remove all line appearances except one.
HuntGroup
Create a huntgroup which contains all extensions you created for the DuVoice system in it's User List.
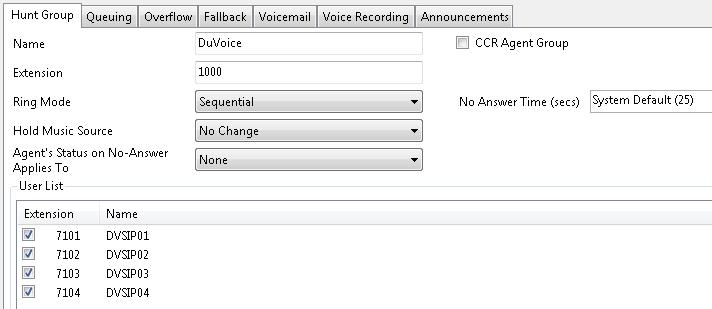
- Queuing Tab
Queuing should be disabled. - Overflow Tab
Configure as needed based on your site requirements. For most installations it is suggested to overflow to the operator huntgroup. - Voicemail Tab
Voicemail On should be unchecked. - Voice Recording Tab
Record Inbound should be None.
Mailbox should be empty. - Announcements Tab
Announcements On should be unchecked.
System Voicemail
If you are not using the DuVoice as the primary Voicemail this section may be skipped.
Set the Voicemail type to group.

- Voicemail Type
Set to Group Voicemail. - Voicemail Destination
Set this to the huntgroup created for the DuVoice. - Messages Button Goes To Visual Voice
This must be unchecked. If this option is grayed out set the Voicemail Type to Centeralized Voicemail temporarily then uncheck it. This must be unchecked in order for the Messages Button on digital phones to work properly.
Guest Room Configuration
Note: Guest rooms cannot be hidden from the directory or TAPI MWI and DND will not work.
Guest Extensions
Extension
If the guest is using analog extensions it is recommended to use the following settings.

- Equipment Classification
Select Standard Port. - Message Waiting Indication Type
Select On. Depending on the telephones MWI type you may need to change this another option.
Voicemail

- Voicemail On
uncheck this setting if Voice Mail Pro is used as the primary voicemail, otherwise this box should be checked. If this field is unchecked forwarding must be used for this user.
Forwarding
If you are not using the DuVoice as the primary Voicemail configure forwarding for each guest room using the DuVoice huntgroup created above.

- Forward On Busy
Check this option. - Forward On No Answer
Check this option. - Forward Number
Enter the huntgroup. If this guest is located on a remote IP Office via Small Community Networking, enter the shortcode created for SCN forwarding above instead. - Forward Internal calls
Check this option.
User Right Groups
Create User Right Groups for guest room phones. Although there are many options, the typical configuration is a user rights group for the phones while the room is checked in and another user rights group for the phones while the room is checked out. DuVoice must contain the exact name of the user rights group, case sensitive. Example: “CheckIn” and “CheckOut”.
Shortcode Configuration
MWI ShortCodes
The DuVoice system can use multiple methods to light the message waiting indicator. The perferred method is to use shortcodes which are dialed by the DuVoice system. The other method is to use TAPI which does not require any configuration on the PBX. These shortcodes should be entered in order to support MWI enable/disable. Once entered and saved to the IP Office it is suggested to test these codes using any telephone connected to the PBX. Using this code you should be able to set or clear any phone's MWI light on the PBX even the one your dialing from. Note: These codes will not work on any SIP phone.
Avaya IP Office does not support message waiting lights on any SIP phones. However the DuVoice can still light the lights on these phones using either it's SIPX method which is explained in the DuVoice Manual.
ShortCode for MWI ON
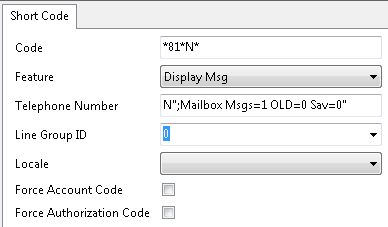
- Telephone Number
N";Mailbox Msgs=1 OLD=0 Sav=0"
If this does not work, replacing Mailbox with MWL may work. Both have been verified to work as of version 9.1.5.
ShortCode for MWI OFF
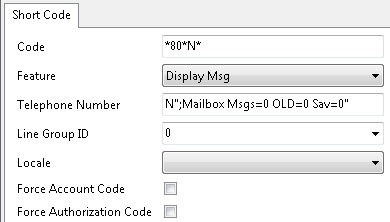
- Telephone Number
N";Mailbox Msgs=0 OLD=0 Sav=0"
If this does not work, replacing Mailbox with MWL may work. Both have been verified to work as of version 9.1.5.
DuVoice Configuration
If for any reason you wish to convert from using TAPI for MWI set all MWI Notification templates method to Inband. Then using System Configuration edit the active Integration template and set the MWI On and off codes to the following.
MWI On commands
MWI Off commands

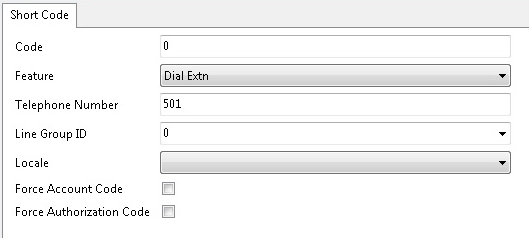
Operator Shortcode
By default the DuVoice assigns the operator mailbox extension “0”. This will be dialed for transfers to the operator, Failed wakeup alerts, and possible 911 Emergency alerts. Avaya IP Office does not have a 0 extension by default. It is required to configure a shortcode that will direct calls to 0 to the appropriate extension or huntgroup. This will normally be the reception desk. The following example sends 0 to huntgroup 501.
TAPI Installation
This section may be skipped unless you are using one of the following:
- Performing message waiting using TAPI.
- Station monitor for offhook stations.
If you purchased your system from DuVoice, the TAPI installation may be found under C:\OEM\Avaya. If this is a kit or you cannot find the version for your specific PBX the driver can be found on the User CD available from Avaya.
Installation

- Click Next.

- Click Cancel. Choosing the PBX at this stage has caused installation issues forcing the TAPI driver to remain in Single User mode which cannot be used.
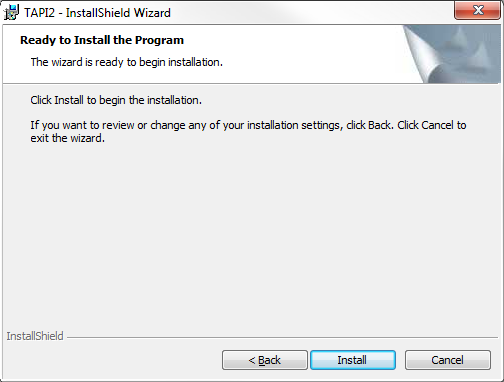
- Click Install
- Click Yes.

- Click Next.
- Click Finish.
Configuration
Configuration is performed from the Windows Control Panel app Phone and Modem.
- Hightlight Avaya IP Office TAPI2 Service Provider.
- Click Configure.
- Switch IP Address
Enter the IP address of your IP Office. - Third Party
Check this radio button. - Switch Password
Enter the password for your PBX, typically password. - Click Ok.
DuVoice Configuration
If your system was purchased from DuVoice you can skip the Installation of Dialogic and the DuVoice software and go directly to Setup Wizard. For Kit installations you must install Dialogic HMP followed by the DuVoice software.
Setup Wizard
Using SIP

- Click Next.

- Fill in all the fields with the site information.
- Click Next.

- Select the option which best matches your PBX or Other if your PBX is not listed.
- Click Next.

- Unless you have chosen Other as your PBX you will be presented with the choice to configure the default setting for message waiting indicators. Some PBX's support multiple types, choose the one which you want to use for your PBX in this case. If you have elected to use ShortCodes choose “Inband using shortcodes”.
- Click Next.

- Enter the IP address of your PBX for SIP registration.
- Click Next.

- Enter the huntgroup of the DuVoice system you have created in the PBX.
- If all the stations are numerical check Auto increment extension numbers based on line 1. and enter the first line number in the space provided. If they are not enter the extension number for each port.
- Click Next.

- Click Finish if all the setting are correct.
Push Server (Optional)
If your running InnDesk along with push server, you can configure it to serve the phone bin and configuration files needed by your IP phones and the DuVoice push server.
Requirements
- InnDesk vesion 1.70 or above.
- DuVoice push server configured.
- DuVoice EAS feature license.
- IP Office.
Configuration
When a IP phone is booted it will attempt to load it's configuration settings file from the HTTP server configured. The InnDesk install places special configuration files in it's folder to force each type of phone to read the same configuration file. For advanced configuration you may edit each of these files to make them suit your particular needs but this is not covered here.
46xxsettings
This file is used for all models of phones and by default all groups and is located in c:\dvweb\static.
- Using notepad open the file C:\dvweb\static\46xxsettings.txt.
- Change all IP addresses in the file to point to that of the DuVoice system. This will be the same IP address used to configure all the phones HTTP server.
Note: Do not edit any other file in C:\dvweb\static. For custom overrides edit the files in C:\dvweb\avaya.
Example File
################################################
##
## DuVoice Custom 46xxsettings.txt file.
##
## This file contains all the minimum requirements
## for avaya ip phones.
##
## Lines which start with two ## are comments
##
## Lines which start with a single # are labels for goto statements
##
################################################
##
## INSTALLER
##
################################################
##
## Change only the IP addresses in this file to match the IP address
## which push server is configured to use.  This is configured in
## System Configuration | Features | Push Server
##
## Then either configure each phones HTTP server to this IP address
## or within the the IP Office Manager.
##
## You may place all IP Office BIN files and other configuration files
## into the folder C:\DVWEB\AVAYA and the phones will pull any updates they
## need from there.  There is no need for additional TFTP or HTTP servers.
##
################################################


################################################
##
## ADVANCED SETTINGS
##
################################################
## Using groups allows a site to block some phones from supporting
## PUSH server.  Examples might include excluding IP phones in
## guest rooms from PUSH access or to use different settings than
## staff phones.
##
## To change the group number from the phone:
## <MUTE> 4 7 6 8 7 #
## groupnumber #
##
## To reset EVERYTHING on the phone. This will delete all settings
## do not use this unless you really wish to reset the phone.
## <MUTE> 7 3 7 3 8 # * #
##
################################################

## Example of special group settings
# IF $GROUP SEQ 100 goto GUEST-PHONES


## End of custom checks.
goto ALL-PHONES


################################################
## This block is an example of using groups for
## specific types of phones.
################################################
# GUEST-PHONES

## SET TPSLIST 192.168.1.1:8090/
## SET SUBSCRIBELIST http://192.168.1.1:8090/
## SET WMLHOME http://192.168.1.1:8090/ipphone/idle.wml
goto END


################################################
## All phone types use the same settings.
################################################
# ALL-PHONES

SET TPSLIST 192.168.1.1:8090/
SET SUBSCRIBELIST http://192.168.1.1:8090/
SET WMLHOME http://192.168.1.1:8090/ipphone/idle.wml
## SET WMLIDLEURI http://192.168.1.1:8090/ipphone/idle.wml

## Optional settings
## SET WMLIDLETIME 20
## SET SCREENSAVERON 25

goto END


## END OF FILE.
# END
IP Phones
Each IP phone should have it's HTTP Server set to the DuVoice IP address. HTTPS Server setting should be left blank as this is not supported.
BIN Files
Place all your bin files and custom configuration files in C:\dvweb\avaya with the exception of the 46xxsettings.txt file.
Advanced Configurations
Listed here are some of the most common advanced configurations DuVoice has seen.
Multiple Room Extensions
In cases where a room may contain multiple phones, each with their own extension these steps are suggested. This setup will support both message waiting and name change for each extension.
Each room in the Property Management System (PMS) is configured as hunt group in the IP Office. This should match the primary extension for the room. This hunt group number should also equal the rooms mailbox number.
PBX Configuration
Create a hunt group which contains each extension in the room.

- Name
Enter a name. This field will be modified on name changes. - Extension
Enter the extension for the room. - Ring Mode
Set to Collective so all extensions ring. - No Answer Time
Set this to a reasonable no answer time. Suggested to be 6 seconds. - User List
Enter all the extensions in the room.

- Disable Queuing.

- Overflow Group List
Enter the voicemail hunt group.

- Voicemail On
Uncheck this.
DuVoice Configuration
The system by default has has a template for Message Waiting On/Off, in order to light the Message Waiting indicators for all the rooms extension you will need to create new templates for the maximum number of extensions in any room. In this example each room has two extensions.
From Mailbox Administration choose Templates | Notifications.

- Highlight MWI On, click Copy and enter a meaning full name.

- Change the Address number to use. Default is 0, here we enter 1 for the next.
Perform this same copy for MWI Off and set the Address number the same. Repeat these steps for every additional extension in the room increasing the Address number each time.
From the room, in this example 7114, choose Address List. Edit MWI 0, and enter the first extension number. Add Additional addresses for each extension.

Choose Notifications, add the new templates you created to the list. This list may only contain 10 events, if you need to add more choose Map to DTMF and add them there.

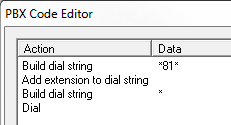
Record-A-Call
Using this shortcode you can record a call by conferencing in the DuVoice by dialing this shortcode. The message will be automatically deposited in the mailbox matching the extension which dialed the shortcode. You can replace the E with an a mailbox of your choice as well.
This will only work when using SIP or TAPI integration.
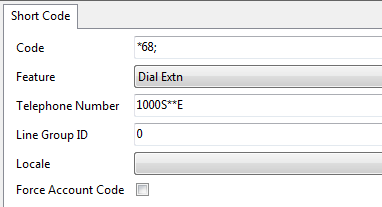
- Code
*68; - Feature
Dial Extn - Telephone Number
DuVoice huntgroup number, followed by S**E
Troubleshooting
Hospitality
Wakeup calls forward to VM
The recommended no answer time is 25 seconds.
Name Changes
Failure for the system to perform name changes can be linked to several problems. These are the most typical reasons why name changes will fail.
- Certificate is out of date.
- Certificate has been generated by Avaya tech support and not Avaya.com or the PBX itself.
- The IP Office has been upgraded.
- DuVoice has been upgraded. DuVoice ships the most recent versions of the Avaya Configuration Management API and if the PBX remains at an older version most likely the new Avaya DLL's are not compatible with your PBX. This can only be resolved by upgrading the PBX or by contacting DuVoice tech support.
Another cause of failure is because names contain unicode or accented characters which the Avaya does not like.
Note:
The Avaya SDK used to perform these changes is not always compatible with older versions of IP Office. If you feel this might be the case you can try to copy the older DLL's from the older version of IP Office Manager. The voicemail must be shutdown to perform this action.
Copy the following DLL's from your IP Office Manager folder (C:\Program Files (x86)\Avaya\IP Office\Manager) to the DuVoice folder (C:\duvoice). It is strongly suggested you make a backup of the existing versions in case this does not resolve the issue.
- AvailabiltyValidationVisability.dll
- CoreServices.dll
- LegacySettings.dll
- SecurityManager.dll
- UpgdWiz.dll
- WhoIs2.dll
- WindowsControlLibrary.dll
Message Waiting (MWI)
Message Button Fails
On upgrades and by default the IP Office is configured so that the message button sends user to visual voicemail rather than the voicemail system defined.
- Login to IP Office Administration.
- Go to the System settings.
- Click on Voicemail tab
- Uncheck “Messages Button Goes to Visual Voice”. You may need to set the voicemail type to something besides “Group Voicemail” if it’s disabled long enough to uncheck the box.
- Save changes and merge the configuration.
MWI Light goes on then immediately goes off
This is typically caused because the extension is configured for voicemail and the DuVoice is not the primary voicemail. Typically the IP Office is configured to use it's own voicemail and when the DuVoice sends a code to turn the light on it will do it, but then immediately turn it off because the IP Office's internal message queue for the extension says it has no messages.
The fix in this case is to disable voicemail for the extension. If this is done you must confirm that the extension is using forwarding in order for the DuVoice to act as it's voicemail mailbox. If the extension is to use the IP Office for it's voicemail you must delete the mailbox which corresponds with this extension in the DuVoice or disable voicemail in mailbox's class of service.
Integration
Calling system gives Fast Busy
Typically this is due to the fact the system does not have Voice Compression Module.
DND Disables forwarding
This is a problem with the Avaya TAPI driver which is used to enable/disable DND for a user. This is typically not a problem, however when using forwarding on users rather than configuring the DuVoice system as the voicemail it can occur.
Using System Configuration, goto Features | Connectors | IP Office and check Disable support for DND.
DND for room phones will no longer work, but can be substituted by configuring additional User Rights groups.
IP Office
Date and times in logs
The IP office monitor application is really nice, however it has one major flaw in that it will not time/date stamp the entries.
You can change this behavior by checking the following two fields on the System tab.
Prefix YYYY-MM-DD hh:mm:ss:mss
Date/Time Periodic Prints

ipoffice