UNIVERGE 3C
Requirements
- DuVoice 5.3.
- Dialogic HMP.
- UNIVERGE 3C version 8.5.3 or above.
Features
| Feature | Description |
|---|---|
| Class of service | Yes |
| Direct calls | Yes |
| Call forward RNA/Busy integration | Yes |
| DND | Yes |
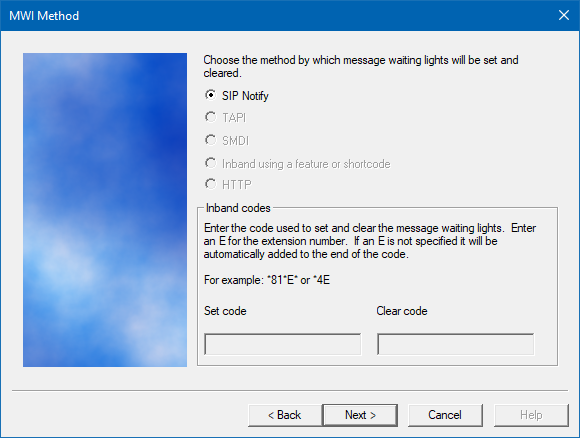
| MWI | Yes via SIP Notify. |
| Name changes | Yes, first and last name. |
| Lines | Only a single SIP extension is used for multiple ports. |
PBX Configuration Part One
The 3C configuration is a two part process. First prepare the PBX to accept the DuVoice system as a new trunk, followed by configuration of that trunk.
Active Directory
Create an active directory account which will be used by the DuVoice system for accessing the Web Services. Configure this account so that the password does not expire and the user cannot change the password.
Web Services User
The DuVoice system utilizes 3C Web Services to provide hospitality related features such as Check-in, Check-out, Class of Service Change, Do Not Disturb set/cancel and Name Display change. In order for DuVoice to utilize these Web Services, a Web Services User must be created in 3C with username and password credentials. These credentials provide the system with the rights needed to perform administrative functions via the 3C Web Services.
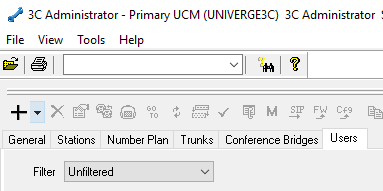
In 3C Administrator, click on the Users tab. Click on the plus sign.
After clicking on “Add”, Browse the active directory and select the Web Services user which you created previously.

General Tab
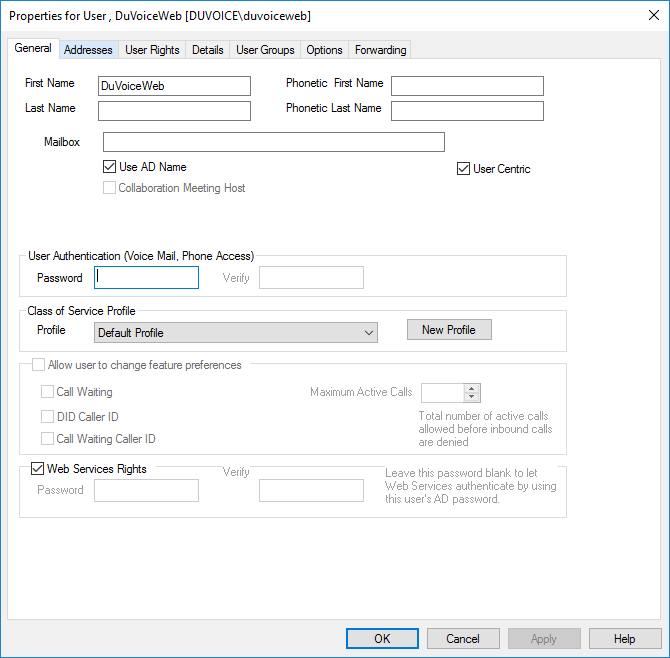
- Confirm Use AD Name, 3C Administrator and Web Services Rights are checked.
User Rights Tab
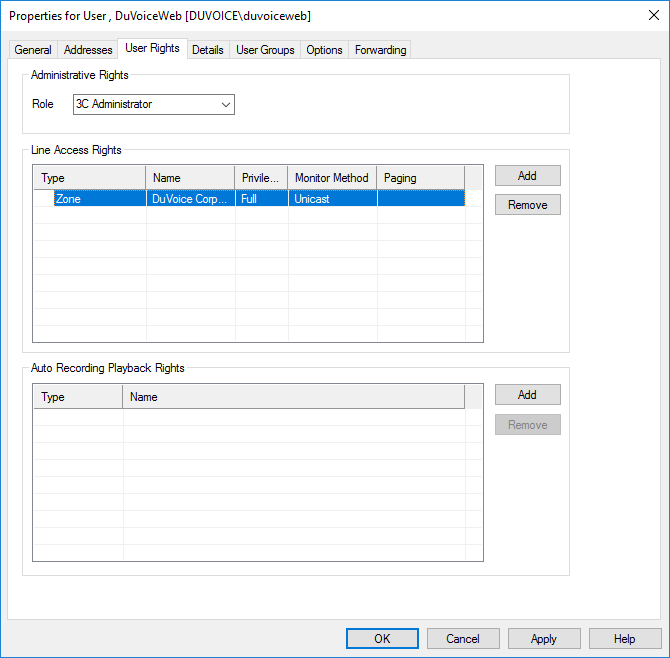
- Click add and choose Zone.
- Change Privilege to Full.
- Change Monitor Method to Unicast.
SIP User Agents
The NEC uses the SIP user agent string to verify access and for configuration of individual phones. The DuVoice system by default uses the user agent string of DuVoice. Verify a SIP user agent has been configured for the DuVoice system and if not add one using the following settings.
Double Click on System
Click SIP tab
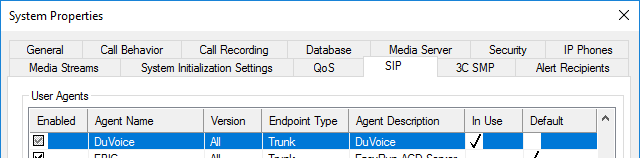
- If there is not an entry for DuVoice, click Add and and create one with the Agent Name of DuVoice.
- Confirm the properties are set as follows.
Settings
Change the following settings from their defaults.
| User Agent Parameter | Value |
|---|---|
| MWI NOTIFY Request | Supported |
| MWI SUBSCRIBE Request | Unsupported |
| Send Forwarding Information | Using Diversion Header |
| Send Non-Primary Number | Using Diversion Header |
| xpidf+xml support for Presence | Unsupported |
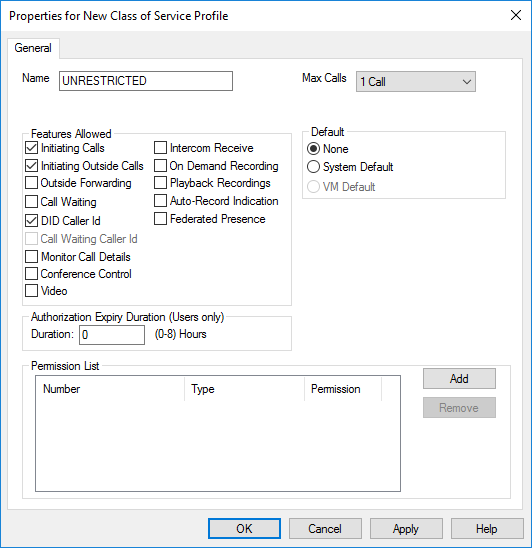
Class of Service
The DuVoice system can change the class of service for guest rooms at check in/out or via InnDesk. These class of service names can be anything appropriate for a hotel.
In this document we will create class of services which match the DuVoice defaults, for more information how these can be configured see the DuVoice Manual.
Class of service names are case sensitive.
UNRESTRICTED
Suggested settings for checked in rooms.
RESTRICTED
Suggested settings for checked out rooms.

Forwarding
By default 3C will not forward RNA or BUSY calls to voicemail, therefore all guest rooms should have their forwarding set to the DuVoice systems extension. It is not suggested to have a ring count much greater than 4 for best wakeup call results.
DuVoice Configuration
If your system was purchased from DuVoice you can skip the Installation of Dialogic and the DuVoice software and go directly to Setup Wizard. For Kit installations you must install Dialogic HMP followed by the DuVoice software.
The DuVoice uses only a single extension on the PBX for access, therefore only line 1 should be configured to register with the PBX. The Wizard will automatically configure Line 1 for registration and leave all others disabled. Because of this all Lines should be configured for the same extension in order to tell the PBX who is performing a callout.
Note
If more lines are added make certain only line 1 is ever configured to register with the PBX.
Install Dialogic HMP
Before DuVoice software can be installed, the Dialogic HMP drivers must being installed and configured. Dialogic HMP installation steps
Setup Wizard
The first page is informational only, listing what information you will need to complete the setup process. When you are ready to proceed, click Next.

On the Site Information page, you must, at a minimum, enter the site name and a site phone number. Dealer name, phone number, and address may optionally be entered as well. When finished, click Next to continue.

On the Tenant Information page, enter the extension or hunt group number for the operator; the default is 0. If you would like the operator to have a mailbox for receiving messages, check the box provided. When finished, click Next to continue.

On the PBX Model page, select the PBX integration to use. If your model is not listed, you can just select Other | SIP Enabled PBX for now. The PBX model can be changed later in System Configuration if necessary. Select a PBX and then click Next to continue.
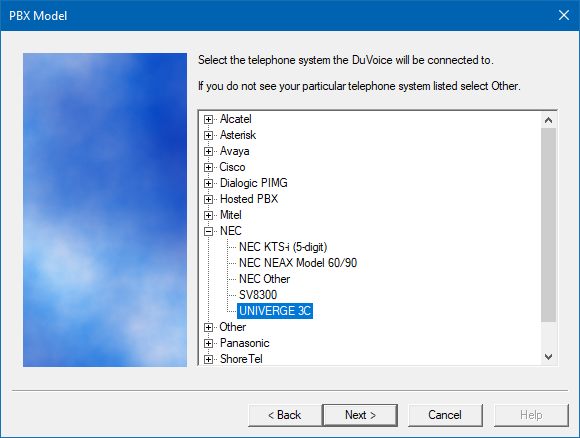
- Choose NEC Univerge 3C
- Click Next.
- Click Next.
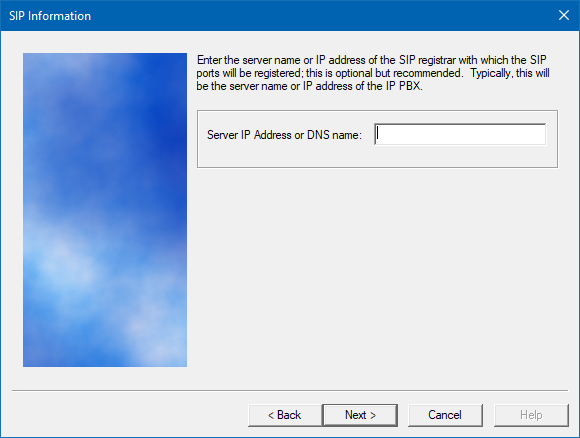
- Enter the IP address of your PBX for SIP registration.
- Click Next.

- Leave the huntgroup blank.
- Enter the intended extension number for the DuVoice for all lines.
- Click Next.
Review your changes then click Finish to complete the wizard.
Configuration
If the system will be handling name changes and other hospitality features, you can configure those now using System Configuration.
Hospitality
Using System Configuration, select Features | Hospitality | Phone Control.

- PBX
Choose UNIVERGE 3C. - User group restrictions
If you know the user groups for checked in and checked out rooms enter it now along with the PMS value. If you don't know it, you can return to this section later. - Click Ok.
PBX Link
Using System Configuration, select Site | Profiles.
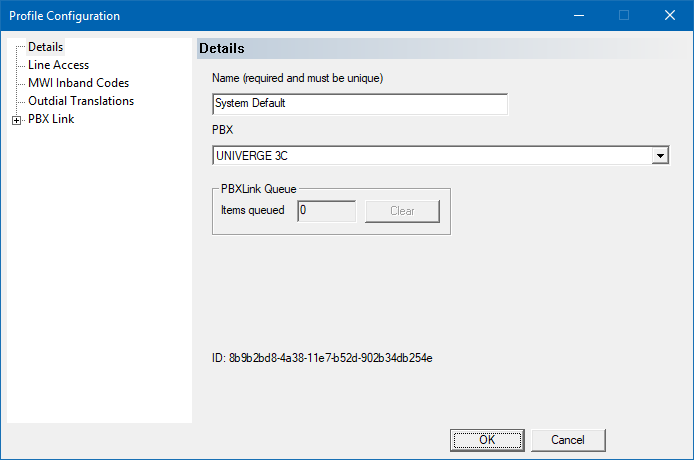
- PBX
Choose UNIVERGE 3C.
- Name or IP address
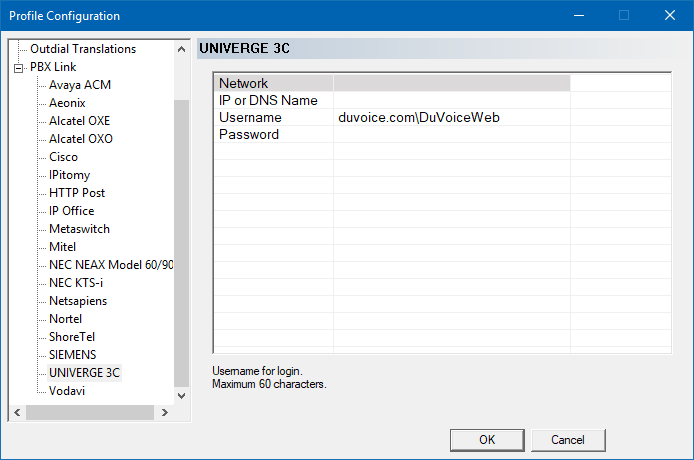
Enter the IP address or DNS name of the UNIVERGE 3C. - Username
Enter the user name you created in the active directory for the Web services account. Typically you must specify the domain as part of the username. - Password
Enter the password you set for this account. - Click Ok.
PBX Configuration Part Two
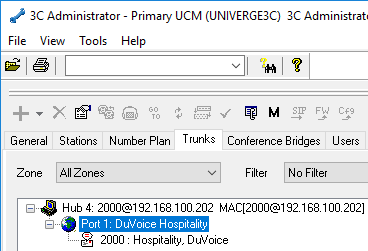
Start the DuVoice system using Activity Monitor, Service | Start. This will connect to the PBX which will automatically create a new trunk for the DuVoice.
You should see this new trunk listed under 3C Administrator | Trunks tab. It's SIP address should be comprised of the extension you entered during the wizard and the systems IP address.
Using the UNIVERGE 3C Administrator, expand the DuVoice trunk and right click on Port 1 and choose View Properties.
Trunk Configuration

- Total Capacity
Enter the number of DuVoice ports configured. - Inbound Capacity
Enter the number of DuVoice ports configured. - Outbound Capacity
Enter the number of DuVoice ports configured. - Click Outward Routing tab.
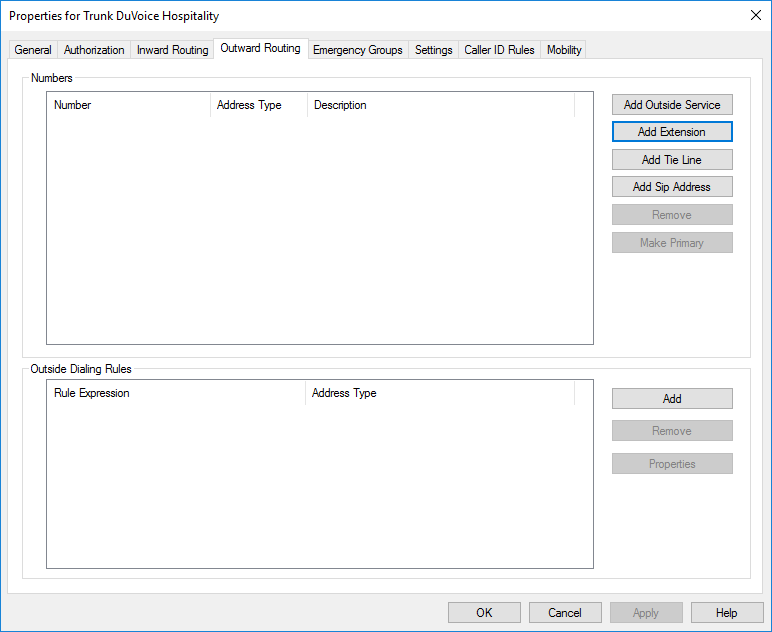
- Click Add Extension.

- Click New Extension.
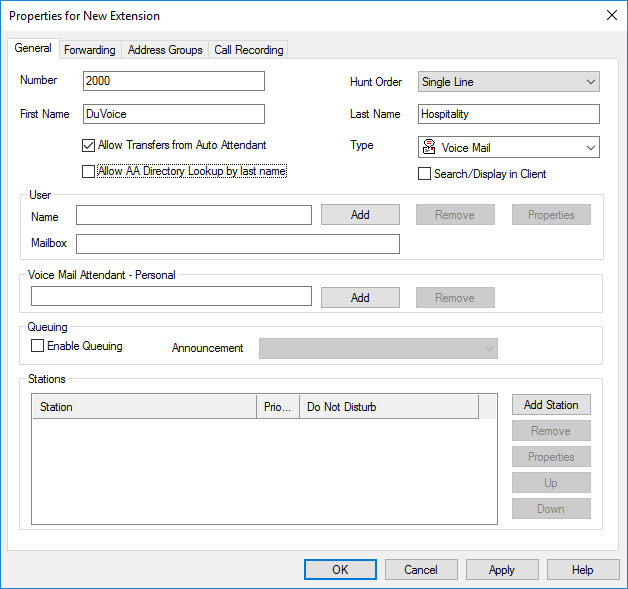
- Number
Enter the extension number for the DuVoice system. - First Name
Enter a descriptive name. - Last Name
Enter a descriptive name. - Type
Choose Voice mail. - Allow AA Directory Lookup by last name
Suggestion is to uncheck this feature. - Search/Display in Client
Suggestion is to uncheck this feature. - Click Ok.
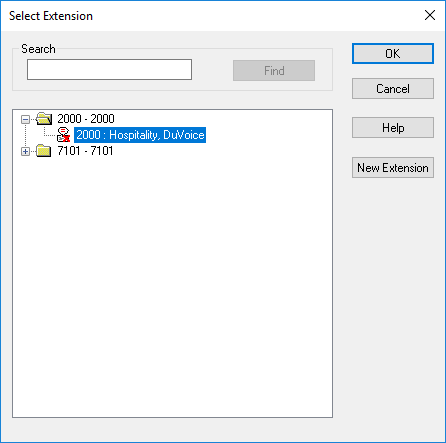
- Hightlight the newly created extension.
- Click Ok.
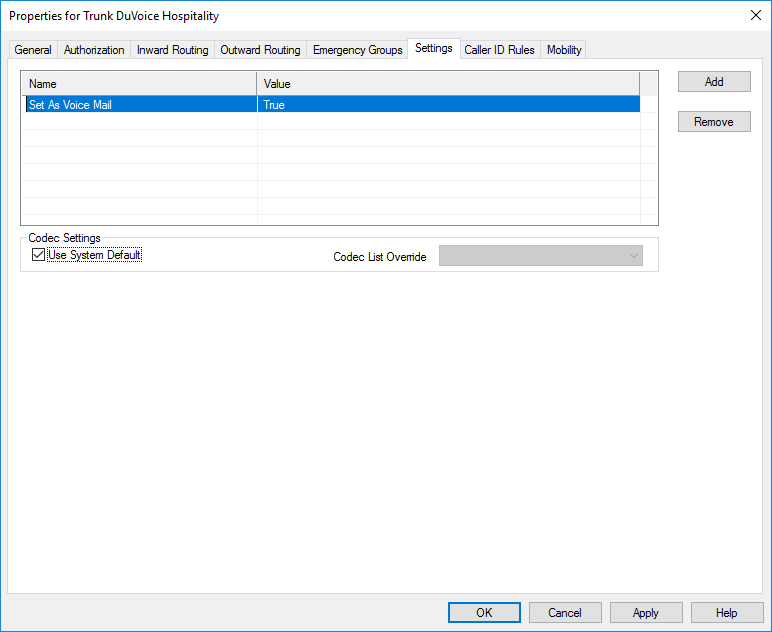
- Click Add and then under the name column select Set As Voice Mail.
- Under the value column choose True.
- Click Ok.
Troubleshooting
This PBXLink actions are performed by the Hospitality Server itself and there are no additional logging available.
Hospitality Server when a name changes is attempted executes the process c:\duvoice\sphereio.exe with command line arguments. For debugging it is possible for a technician to run this application themselves, however only minimal output will be seen.
| Argument | Description |
|---|---|
| -s | IP Address of PBX. |
| -u | Username. Some sites may require domain\username. Example: duvoice.lan\bsampson |
| -p | Password. |
| -e | Extension to modify. |
| -l | Last name. |
| -f | First name. |
| -np | Optional group to assign. |
| -dnd | Optional dnd setting. 0=Off, 1=On |
Example
sphereio -s 127.0.0.1 -u bsampson -p 45ag33 -e 7501 -l Brock -f Sampson