Zoom
The DuVoice DV2000 provides hospitaility features to ZoomPhone hosted VOIP service.
The features include a link to the property management system (PMS) to push the guest names into the ZoomPhone guest room extension profile, allow housekeeping to use the guest room telephone to report room clean/dirt status to the PMS, guest wakeup calls and guest voice mail.
The DV2000 connects to the ZoomPhone system using a combination of standard SIP extensions and through a ZoomPhone App developed by DuVoice.
New or existing guest VOIP or analog telephones can be used in the application.
The features will meet and/or exceed any existing on premise based PBX solution.
Features
- Forward guest extension to DV2000 for guest voicemail
- Auto login to guest mailbox with no password
- Wakeup calls set by guest or staff
- First and last name change in ZoomPhone
- Room Clean/Dirt Status from guest room telephone
- Set DND or wakeups from PMS
- Guest room telephone restrict/un-restrict using roles
Requirements
- DuVoice 8.1.23 or above.
- One ZoomPhone Extension per guest room
- One ZoomPhone user extension DV2000 port
- SRTP/TLS Dialogic HMP License.
- Zoom Application.
- All usernames of users using the DV2000 as voicemail must include their mailbox number in either the first or last name field.
*First or last name of checked in rooms should have ${mailbox} added. This is set under the Tenant | Name Translations.
Network Considerations
- Two NIC connections are recommened (not required) to separate the VOIP and PMS data links. Two NICs are provided on a DuVoice Nano appliance.
- The DV2000 sends the message light (SIP Notify) directly to the guest room telephone which requires the guest telephone IP address be stored in the DV2000.
- Several telephones models can be configured to send the IP address to the DV2000.
- If not the telephone MAC addresses will be needed or the telephones require fixed IP addresses.
Zoom Configuration
Setting up SIP Integration for DuVoice
Creating the User Extensions for the DV2000 ports
- The DV2000 requires one user extension per port.
Users are created within the 'ADMIN' > 'user management' > 'users' section.
Assigning DV2000 User to Device
During this step, we'll create a DV2000 Device within Zoom, and then add all the DV2000 users to the device.
- Requires MAC address of the DuVoice server.
- Must assign all DV2000 users to DV2000 Device.
Assigning is done within the 'ADMIN' > 'Phone System Management' > 'Phones & Devices' section.
- Click 'Add' button.
- Under 'Display Name' field add: DV2000
- Under 'MAC Address' add the MAC address of the DuVoice server.
- Under 'Device Type' drop down select the 'Other' option.
- Click the 'Assign' button.
- Select the first DV2000 user.
- Click the 'Add' button.
- Repeat previous two steps until all DV2000 users are assigned to this device.
- Click the 'Save' button.
- Keep this screen open for the next step.

Acquiring SIP Credentials
The DV2000 SIP ports require credentials from the provisioning page.
- On the assigned DV2000 device page, click on the 'Actions' button.
- Then click the 'Provision' option.
- Check the box that says 'By using this device without manually enabling these features, you accept all risks associated with it.'
- Copy all of the details listed under the 'SIP Account'.
- This will be used to configure the DuVoice SIP integration.

Setting Up Guest Extensions
Only a basic ZoomPhone extension licence is required.
This licence just needs to be able to make local/long distance and 911 calls.
It also needs to have the calling handling option to forward on busy or reing no answer to the DV2000 extension (or group).


Forward the guest room extension to the DV2000 extension or group number:

Creating Zoom Application for DuVoice PBX Link
The Zoom application will be available in the Marketplace soon.
Before then, a custom app can built for each application.
Custom App Creation
The 'Marketplace' can be accessed within 'ADMIN' > 'Advanced' > 'App Marketplace' section.
- Click on the 'Develop' drop down menu button (in the top right).
- Then click on the 'Build app' option.
- Select the 'Server to Server OAuth App' option.
- Click on the 'create' button.
- Under 'App Name' type: DV2000
- Click on the 'Create' button.
Custom App Configuration
App Credentials Tab
On the first page, it should be labeled 'App Credentials'.
Copy the information within all three sections:
- Account ID
- Client ID
- Client Secret
These will be used for the PBX link configuration on the DuVoice server.
Click on the 'Continue' button.

Information Tab
Add the following details to this tab.
Basic information
- App Name: DV2000
- Short Description: Hospitality PMS Interface
- Company Name: DuVoice Corporation
Developer Contact Information
- Name: Jon Dulude
- Email: jdulude@duvoice.com
Click on the 'Continue' button.
Features Tab
Click on the 'Continue' button.
Scopes Tab
There are several specific features that are required for the DuVoice PBX link to function.
- Click on the 'Add Scopes' button.
- Copy this:
user:read:user:admin - Paste into the search field. Then Select the option that appears. Then Clear the search field.
- Copy this:
user:read:list_users:admin - Paste into the search field. Then Select the option that appears. Then Clear the search field.
- Copy this:
user:update:user:admin - Paste into the search field. Then Select the option that appears. Then Clear the search field.
- Copy this:
phone:read:list_devices:admin - Paste into the search field. Then Select the option that appears. Then Clear the search field.
- Copy this:
phone:read:device:admin - Paste into the search field. Then Select the option that appears. Then Clear the search field.
- Copy this:
phone:read:list_users:admin - Paste into the search field. Then Select the option that appears. Then Clear the search field.
- Copy this:
user:update:presence_status:admin - Paste into the search field. Then Select the option that appears. Then Clear the search field.
- Copy this:
phone:read:list_voicemails:admin - Paste into the search field. Then Select the option that appears. Then Clear the search field.
- Copy this:
phone:delete:voicemail:admin - Paste into the search field. Then Select the option that appears.
- Click the 'Done' button.
Click the 'Continue' button.
Activation Tab
Click on the 'Activate your app' button.
DV2000 Configuration
Telephony Configuration

Local Settings
| Setting | Description |
|---|---|
| Port | Port number system should listen for SIP communication on. Default is 5060 |
| Transport Protocol | SIP typically communicates via UDP which is the default. If the PBX is configured for TCP only then choose TCP. |
PBX Settings
| Setting | Description |
|---|---|
| Address | IP address or DNS name of your Zoom PBX. |
| Port | Port number PBX listens on for SIP communication on. Default is 5060 |
| Expiration Time | Enter the time, in seconds, the channel will wait between registrations with the PBX. SIP endpoints (channels) are required to maintain registration with the PBX in order to have calls routed to them. Adjust this setting to be less than the maximum for your PBX. For example, the older Avaya IP Office system default to 180 seconds, while other PBX systems have an expiration time of 3600 seconds. The default value is 3600 seconds. |
| Realm | Leave blank. |
| Domain | Leave blank. |
| Register accounts using | Leave set to PBX Address. |
Proxy server
These settings are optional and typically only used when connecting to a PBX which exists on the internet rather than locally.
| Setting | Description |
|---|---|
| Address | Enter the address of the Zoom proxy server. |
| Port | Port number proxy server uses for SIP communication on. Default is 5091 |
Security
| TLS Cert File | Path to the TLS certificate file to use. Leave blank unless using TLS. Use the DigiCertGlobalRootG2.crt.pem certificate. Placing this file in C:\VS\DATABASE will ensure it gets backed up. |
TLS Cert File Source
PBX Link
This PBXLink uses the Zoom API for Account User or Common Area settings in order to update them with first name, last name, and other extension changes.
Features
- Extension based.
- First and Last name and Display name change.
- Optionally set the department name of the account.
- Optionally delete voicemail messages from Zoom for users and common areas.
- Do not disturb on/off. Do not disturb will only be active for 24 hours based on Zoom API.
Requirements
- DV2000 8.1.29 or above.
- Names must contain extension number.
- Zoom must support P-Asserted-Identity (PAI) for forwarded calls.
Zoom
Zoom enforces strict rate limits in order to provide better service among it's clients. Due to these rate limits changes are limited based on your account level. All changes use the medium rate limit.
Requirements
A Zoom application with the correct scopes assigned is required.
PAI
To enable P-Asserted-Identity (PAI) for forwarded calls go to: Number Management | BYOC Configuration. Enable Include original calling number within the P-Asserted-Identity (PAI) header for forwarded calls.
Note: These configurations may not be show for some Zoom accounts.
Scopes
The following scopes are required by the DV2000.
Required
| Scope | Reason |
|---|---|
| user:read:user:admin | Read user. |
| user:read:list_users:admin | List users. |
| user:update:user:admin | Update user. |
| phone:read:list_devices:admin | List devices. |
| phone:read:device:admin | Read device. |
| phone:read:list_users:admin | List phone users. |
Optional
Features will be disable if not found at startup.
| Scope | Reason |
|---|---|
| phone:update:device:admin | Update device for caller id. |
| user:update:presence_status:admin | Update presence status like dnd. |
| phone:read:list_voicemails:admin | List voicemail. |
| phone:delete:voicemail:admin | Delete voicemail. |
| phone:read:common_area:admin | Common Area access. |
| phone:update:common_area:admin | Common Area access. |
DV2000
Names must contain the extension number. This is done via Name Translations. The suggested setting is to change Full name to the following:
${vip} ${first} ${last} ${extension}
The device used by the DV2000 must also have it's name changed to include it's extension in order to answer correctly. Do no enter any other numbers in the name field other than the extension as well.
Profile Configuration
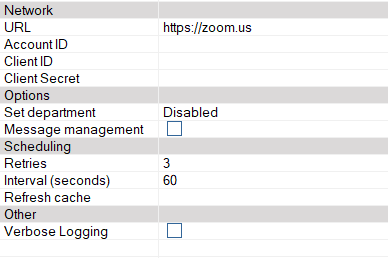
Network
| Field | Description |
|---|---|
| URL | Enter the Zoom URL. Zoom will automatically respond with a region specific URL for making changes. |
| AccountID | Enter the account id of the Zoom application. |
| ClientID | Enter the client id for the Zoom application. |
| ClientSecret | Enter the client secret for the Zoom application. |
Options
| Field | Description |
|---|---|
| Set Department | Optionally set the department field of the user account. |
| Message management | Check this box when using Zoom for guest messaging. When checked the system will automatically delete all messages for a user or common area. |
Department Options
| Disabled | Field will not be set. |
|---|---|
| Checked in/out state | State of the room, showing if it's checked in or out along with the date. |
| Mailbox description | Description field located in the mailbox. |
| Mailbox room ID | Room ID field located in the mailbox. |
| Tenant name | Name of the tenant the extension is associated with. |
| Site name | Name of the site. |
Scheduling
| Field | Description |
|---|---|
| Retries | Number of attempts to make changes on PBX before giving up. Default: 3 |
| Interval (seconds) | Number of seconds to wait between retries. Default: 60. |
| Refresh cache | Number of minutes between refreshing cache of extensions. Always refreshed on startup. Default: 480. |
Other
| Field | Description |
|---|---|
| Enable debug | All communication packets will be logged. WARNING: This will make very large log files and should only be used during testing. The system doesn't need to be shutdown for this to take effect. |