Alcatel OXE
The DuVoice 7.01 can link to an Alcatel OmniPCX Enterprese (OXE) PBX using a TCP connection where the PBX is the server. This link uses the protocol and features listed in the table below:
| Link Type | Protocol Used | Log File Prefix | Features Supported |
|---|---|---|---|
| TCP Client | AHL (Edition 3) | ALCATELOXE | Check In, Check Out, Name Change, Language, Maid Status, Controlled Restriction, DND, VIP, SMDR, 5- or 8-digit extensions |
If GPIN support is enabled, the link also supports the Allocation message. If the GPIN specified in the message is assigned to an extension other than the one being allocated, the message is treated as a room move.
If you are using the Genesis call accounting system and need the SMDR to be passed to the CAS from the DV2000 (rather than by a separate SMDR link between the PBX and the CAS), you will need to configure the CASLink server.
Configuration
This page is used to configure the DV2000's link to the Alcatel OXE.
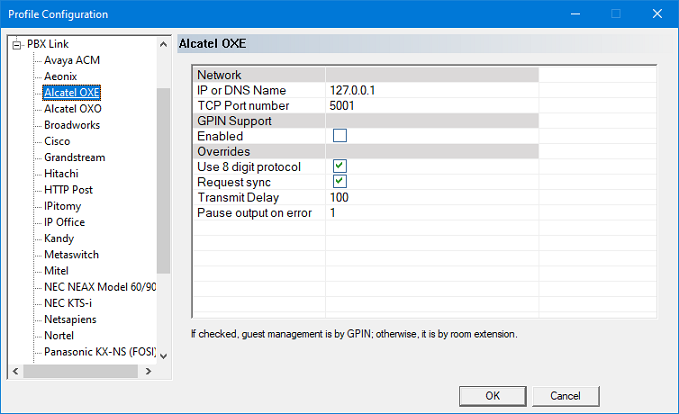
The settings are grouped into three categories: Network, GPIN Support and Overrides. Configure the settings as needed and then click OK to save your changes and close the dialog. Or click Cancel to discard any changes and close the dialog.
Network
| Setting | Default | Description |
|---|---|---|
| IP or DNS Name | (blank) | Enter the IP address of the PBX. |
| TCP Port number | 5001 | Enter the port number to connect to on the PBX. |
GPIN Support
| Setting | Default | Description |
|---|---|---|
| Enabled | Disabled | Check this box to enable GPIN support on the system. |
Overrides
| Setting | Default | Description |
|---|---|---|
| Use 8-digit protocol | Disabled | Enable this setting if your Alcatel OXE PBX is configured to allow extension numbers to be up to 8 digits in length. If the maximum extension length on the PBX is 5 digits, leave this setting disabled. |
| Request sync | Enabled | If enabled, then at startup the DV2000 will request that the PBX initiate a data swap. This is particularly important if GPIN support is enabled. |
| Transmit Delay | 500 | Enter the time, in milliseconds, that the voice server should wait after sending a message (and receiving the ACK response) before it can send another message. The default is 500 ms (half a second). If the PBX is getting overwhelmed, you can increase this value to artificially slow the pace of message traffic. |
| Pause output on error | 1 | Enter the number of minutes the DV2000 should refrain from sending messages to the PBX if it receives a Reply message with the error 'Unreachable Database'. |
GPIN Management on the DV2000
The Alcatel OXE's hospitality features provide the ability to communicate with the PMS (or the DV2000 as middle-ware) using either room extension management or GPIN management. For room extension management, all messages between the systems are keyed to a room's extension number. Most features such as check in, check out, name change, and so forth are supported. However, room move is not supported in this mode.
To support room move, the PBX and the DV2000 both must be configured to enable GPIN management. In this configuration, all messages are keyed to the GPIN, which is assigned at check in. All features supported by room management are also supported under GPIN management; room move is also supported in this mode. Depending on the PMS connected to the DV2000, GPINs may be assigned either on a per-room basis or a per-guest basis.
Limitations
At this time, GPIN management support on the DV2000 requires that the DV2000 manage the GPIN pool and control GPIN assignment. The DV2000 does not support having the PBX manage and assign GPINs, nor does it support allowing the PMS to manage the pool.
Usage
To use the GPIN feature, you must do the following:
- Enable the GPIN feature
- Enter all valid GPIN values into the GPIN Pool table
When the feature is enabled:
- A GPIN is automatically assigned to a guest ID or room mailbox at check-in
- The assigned GPIN is de-assigned automatically at check-out
- Assignment is based on a least-recently-used model
- If all GPINs in the pool are currently assigned, GPIN assignment will fail and the given guest/room will not have a GPIN
- If the configured PMS is using a FIAS-based protocol (which is guest-based), then GPINs are assigned per-guest
- If the configured PMS is not using a FIAS-based protocol (and therefore is room-based), then GPINs are assigned per-mailbox
Use of the GPINs is entirely automatic; manual assignment or de-assignment is not supported.
GPIN Pool
Once you have enabled GPIN support as shown above, the Profile Configuration will display the GPIN Pool button, as shown below:
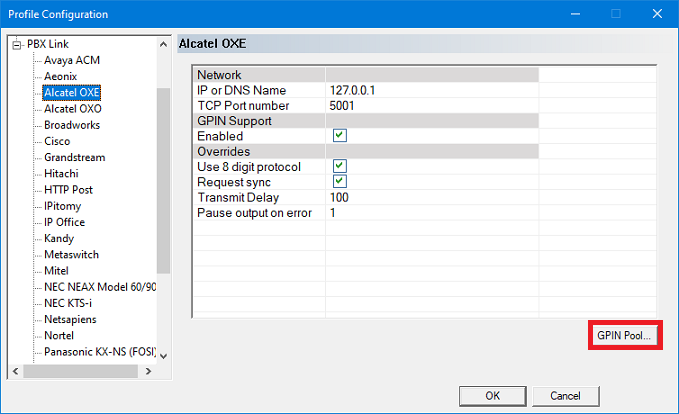
To manage the GPIN pool, click the GPIN Pool button. This will open the GPIN Pool dialog, as shown below:
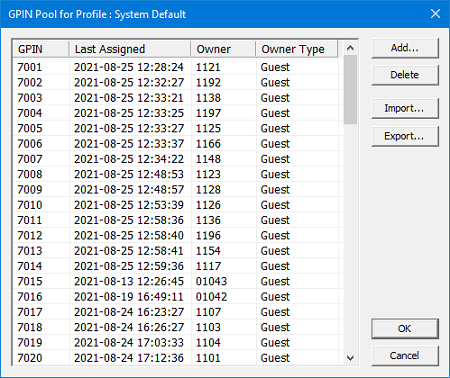
The GPIN table contains the following data. Although GPIN entries can be added to or removed from the table, they cannot otherwise be assigned or modified manually. GPINs are assigned automatically at check-in on a Least-Recently-Used basis.
| Column | Description |
|---|---|
| GPIN | The GPIN number. |
| Last Assigned | Date and time the GPIN was last assigned to a room or guest. Time is shown using the 24-hour format. |
| Owner | The mailbox number or guest ID to which the GPIN has been assigned, or blank if it is currently unassigned. |
| Owner Type | Indicates whether the Owner value is a 'Guest' ID (used when PMS is guest-based) or a 'Mailbox' number (used when PMS is room-based). |
Add
To manually add one more GPIN values to the table, click the Add button to open the dialog shown below:
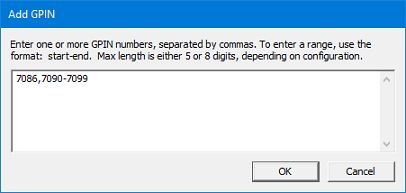
As shown in the example above, you can enter multiple GPIN values, separated by commas, and can also enter a range of GPINs using the format start-end (where start must be a number less than end). As noted, GPIN size depends on the PBX configuration and is limited to either a maximum of 5 digits or 8 digits.
Click OK to add the GPINs or Cancel to close the dialog without adding anything.
Delete
To delete GPINs manually, click on the row to highlight the GPIN you want to delete. You can also press and hold the CTRL key to click on and highlight multiple rows. Then click Delete. The system will ask for confirmation that you want to delete all selected items; click Yes to delete the GPINs or No to cancel the deletion.
Import
You can import the GPINs from a CSV file if desired by clicking the Import button. This will display the Open dialog, as shown below.
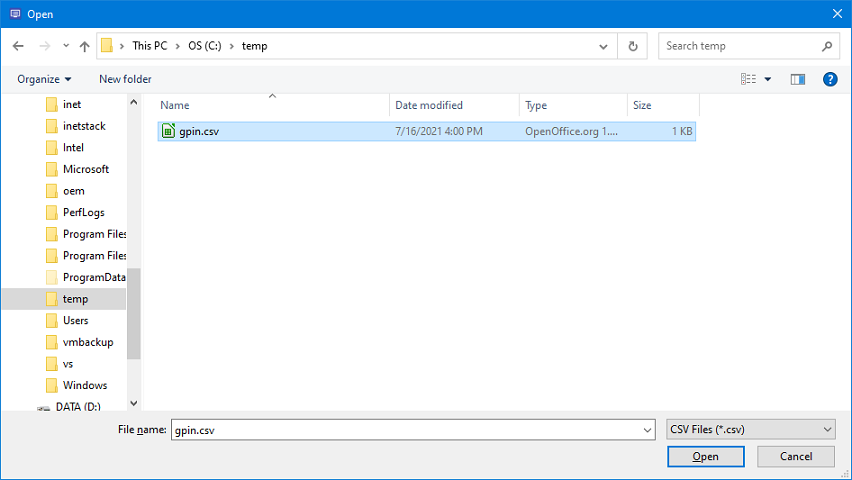
Navigate to the folder containing the CSV file you wish to import. Select the file and click Open.
If the file is formatted with the required columns, the GPIN data will be imported into the table. If the file does not at least contain a column labeled GPIN then the import will fail and an error dialog will be displayed.
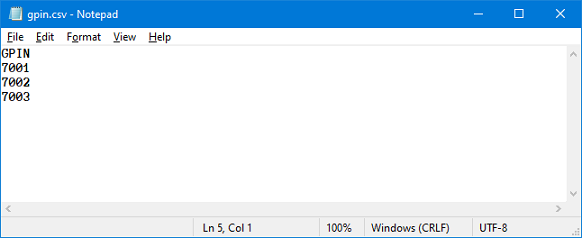
The Import routine requires that the first row in the CSV file must contain the column headers.
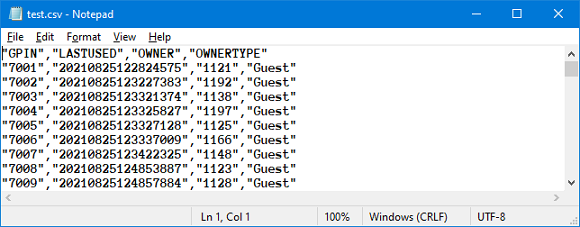
At a minimum, it must contain the header GPIN and may also contain the headers LASTUSED, OWNER, and OWNERTYPE. Any other columns will be ignored.
If included, the LASTUSED column must be a timestamp formatted as YYYYmmddHHMMSSsss where YYYYmmdd is the 4-digit year, 2-digit month and 2-digit day and HHMMSSsss is 2-digit hour (24-hour format), 2-digit minute, 2-digit second and 3-digit milliseconds. All fields but the year may have leading zeros if needed.
The OWNER column must contain a valid mailbox number or guest ID and the OWNERTYPE column must be set to Guest if the OWNER value is a guest ID, or set to Mailbox if it is a mailbox (room) number.
The following shows a sample CSV file containing only the GPIN column:
Export
To export the GPIN table to a CSV file, click the Export button to open the Save As dialog.
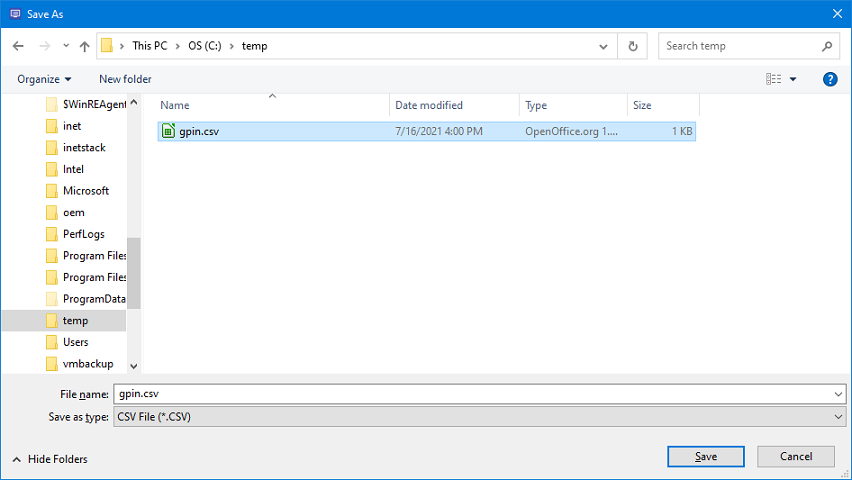
Navigate to the folder where you want to save the exported file. Enter the filename you want to use in the Filename box. Then click the Save button.
The dialog below shows an example exported file.
