Push Server Test Client
The Push Server Test Client can be used to test if the push server application is working and to help troubleshoot it if it isn't.
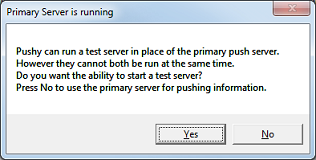
When you run the application, the first thing it will do is display a dialog (similar to that shown below) informing you whether the primary push server is running and asking if you want the option to run a test server.

Clicking No will cause the test server option to be disabled in the main application window. If the primary server is running, as in the case shown above, you should click No; if it is not running, then you may click Yes.
Clicking Yes if the primary server is running will not harm anything by itself; however, if you then proceed to actually start the test server, that will disrupt the voice mail service.
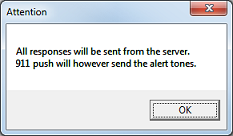
If the primary server is running and you click No in the previous dialog (to not allow the test server option), the application may display an additional message box as shown below. Click OK to continue.

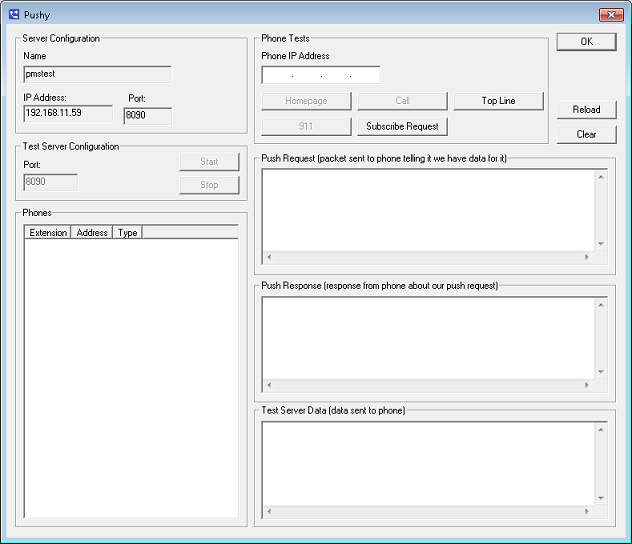
Finally, the application will display the main window, shown below.

Server Configuration
This section defines the settings for the primary push server.
| Setting | Description |
|---|---|
| Name | Name of the machine the application is running on. |
| IP Address | IP address of the network jack from which all pushes will occur. Regardless of the number of network jacks on the system, only one can be used. |
| Port | Port number (as configured in System Configuration). |
Test Server Configuration
This section defines the settings for the test server. If you selected No when asked whether to allow the test server option, then all settings in this section will be disabled.
| Setting | Description |
|---|---|
| Port | Port number that the test server should use. Defaults to the same port configured for the primary push server, but you can use this setting to override it. |
| Start | Starts the test server. Do not click Start if the voice mail service is running. |
| Stop | Stops the test server, allowing you to restart the voice mail service without closing the test app. |
Phones
This section lists the phones which have either auto-subscribed or have been configured for the push service.
| Column | Description |
|---|---|
| Extension | Extension number, as reported by the phone. |
| Address | IP address at which the phone is located. |
| Type | Telephone model. |
Phone Tests
Enter the IP address of the phone set you will be testing in the space provided, or select a phone from the Phones list and its IP address will be filled in for you automatically.
| Action | Description |
|---|---|
| Homepage | Causes a homepage screen to be pushed to the phone. |
| Call | Causes a simulated call screen to be pushed to the phone. |
| Top Line | Causes a top line message to be pushed to the phone, if supported. This feature may not be available on all phones. |
| 911 | Causes a simulated 911 call to be pushed to the phone. |
| Subscribe Request | Sends a request to the phone asking it to subscribe to the server. |
| Reload | Reloads the Phones and 911 lists. |
| Clear | Clears all debug (I/O) windows. |
I/O
The Push Server test client provides three debug windows that display the input to and output from the push server.
| Window | Description |
|---|---|
| Push Request | Displays the raw packet sent to the phone requesting a push. |
| Push Response | Displays the raw packet sent from the phone in response to the push request. |
| Test Server Data | Displays the data sent to the phone from the push request. |
How It Works
The following illustrates the typical sequence of steps for performing a push:
- The 7.00 sends a message to the phone telling it we have data for it to receive (this message is logged in the Push Request window).
- The phone responds to the message with either an
OKor perhaps a security error (this response is logged in the Push Response window). - If the response in step 2 is not
OK, then processing stops here; otherwise it will continue to the next step. - The phone connects to the 7.00 and requests the information it was told to retrieve in the original request message.
- The 7.00 responds with the requested information (which is logged in the Test Server Data window).
In step 2, the phone may respond with a security error or access denied in response to the original request. The typical cause for this is that the system's IP address is not allowed to send push messages, as defined in the phone's 46xxsettings.txt file.